
Hello and welcome to another of my Final Fantasy VII research posts. This time we are going to focus on character 3D modelling.
The first step is accessing to the game models using Blender, my favourite 3D modelling tool. Yeah, I am planning to import into Blender the 3D models from a seventeen year old game.
Fortunately, there is a huge community based on Final Fantasy technological research called Quimm, they have forums and lots of documentation to look for and also a fantastic compilation of all the research alredy done in the qhimm wiki.
We first get our copy of the game, in this case the PC version and look for the files it contains once it is installed:
- cdcheck.exe
- data
- EIDOS.url
- FF7Config.exe
- ff7.exe
- FF7 PC manual.rtf
- FF7 ReadMe.txt
- Register.url
- SFMAN for AWE32,64 ReadMe.txt
- Uninst.isu
There is a data directory there where it seems the game data is stored. Let's check it:
- battle
- cd
- field
- kernel
- menu
- midi
- minigame
- music
- sound
- wm
Well, those folders seem to contain data refering to several aspects of the game. The folders name are pretty descriptive but they also are documented in the qhimm wiki. As we can read in the wiki, the models we are looking for are part of the Field module and will be located in the field folder.
However, this is not going to be an easy quest, and as soon as we open the folder, we find a couple of weird files and a unknown format.
- char.lgp
- flevel.lgp
The content of the files are also described in the wiki.
The char.lgp file may contain what we are looking for, but I can't open that file extension in my Linux system. Wait... maybe I can.
In the tool section of the wiki there are several tool categories, and there is one called Viewers and Extractors. Here we can find a couple of tools for uncompressing those lgp files. I chose ulg basically because it seemed to be more recent than the other, I downloaded it from this forum post. It's a Windows application.
The tool has a GUI mode and a command line mode, and it is programmed in C++11 language. I got rid of all the GUI things and analyzed the code of the command line mode, as it came with the sourcecode and only use multiplatform libraries I was able to compile a Linux version modifing only the Makefile. Nice!
Now I am able to uncompress the char.lgp file and see what does it contain.
The file contains a huge amount of .a .p .rsd .tex and .hrc files with completely undescriptive names like dzed.p or grjc.rsd, these are the files that can be opened with another tool from the tool section of the wiki called Biturn that I downloaded.
Again a Windows tool and this time its far more complex than the other so there is no way we can make it work natively on Linux, we will have to use Wine this time to see if we can make it work.
I'm not a Wine fan, and I avoid using it every time I can, but I have to admit that this time worked flawlessly. We are now able to navigate through the extracted file folder, look for the hrc files and... Here they are!
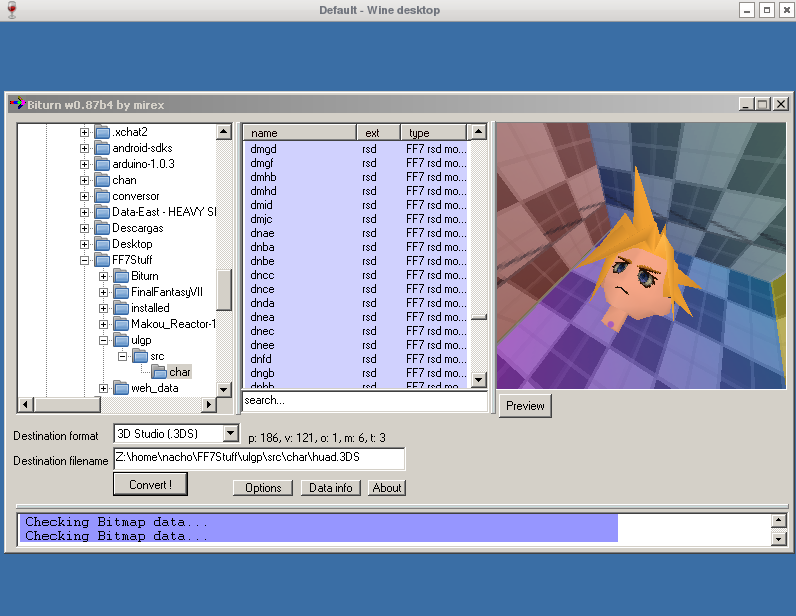
Biturn is fantastic and lets you export the 3D model in several formats compatible with Blender.
This takes us to our final goal. Importing the game files directly to Blender.
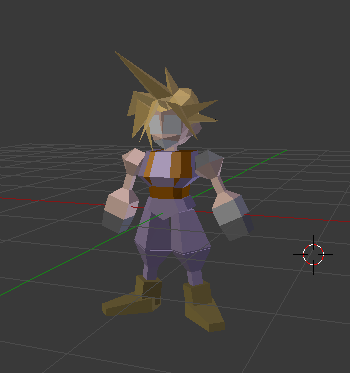
The first thing that you may notice is that they have those white polygons over their face. This is because the models are not completely textured as today's 3D models. Their faces are directly painted with a plain color. Then they created those new polygons over their face that contain the details.
If we select those faces in Blender we can see that are the only textured faces.
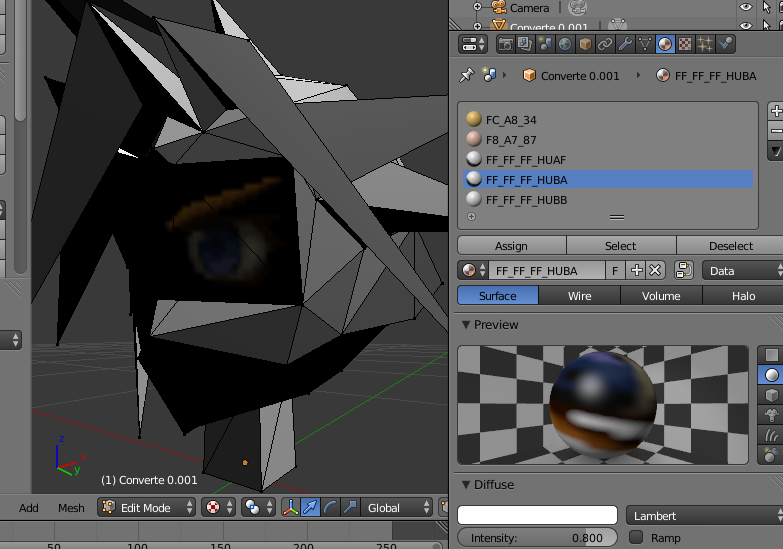
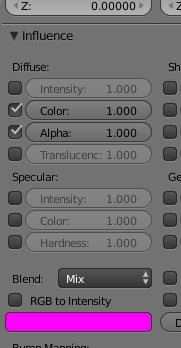
The eye also has an alpha channel that is not activated in Blender by default, and you have to activate in order to get the correct look of the model.
First, go to the eye material and mark Transparency, then set Alpha to 0.0
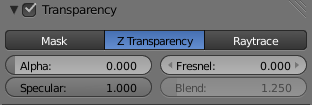
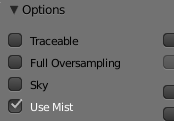
Then go down to Options and unmark Traceable.
Finally go to the texture influence menu and mark Alpha.
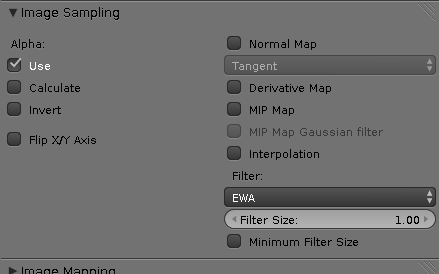
Also disable Mip Map and Interpolation to get the details more pixelated than blurred
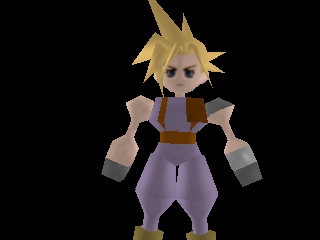
Render the image and... There it is!
From here we can do a lot of things and I will probably cover some of them in the next posts. Until then, see you!