
This is my take on making another Flappy Bird clone you can play in your web browser, featuring Sonic The Hedhehog ripped graphics.
Introduction
Unless you are living under a rock, you have probably heard about all the Flappy Bird madness.
Since it's author decided to remove it from the App Store, developers from every corner of the world started to create lots of clones trying to get their part of the cake.
It's too late for me so in this tutorial I am going to explain how to create your own Flappy Bird clone in HTML5.
This way, the game will be playable from a web browser without plugins, and also from most of mobile devices.
So choose a good playlist, grab a can of energy drink, and lets get started!
Setting up
The first step will be choosing the right technology and creating the project.
I always use the same directory structure for all my simple web projects:
- flappybird: Root directory of the project.
- index.html: Main html file.
- js: Javascript own classes to include in the code.
- img Images.
- css: Stylesheets.
- lib: External Javascript libraries.
Create that empty directory and subdirectory structure, now go to http://code.createjs.com/ and download the latest createjs minified library (at the time of writing this is createjs-2013.12.12.min.js) and place the file inside the lib directory of your project.
Now create the index.html file in the root folder. Once you have done this, open that file for editing and write this.
<!DOCTYPE html>
<html>
<head>
  <meta http-equiv="Content-Type" content="text/html; charset=UTF-8" />
  <title>Flappy Bird</title>
  <script type="text/javascript" src="lib/createjs-2013.12.12.min.js"></script>
</head>
<body>
  <h1>Flappy bird</h1>
</body>
</html>
That text declares it is and HTML file, sets the title and includes the createjs library from the its folder.
Then in the body just adds the title.
At this point if you open the file with the browser, the page will show nothing more than the title, so let's go on.
Now create a file called style.css in the css folder and write this in it.
body {
  margin : 0;
  background-color : #c0c0c0;
}
h1 {
  color : #fffff;
}
Then include this css file in the index file by writting this inside the head tag.
<head>
  <meta http-equiv="Content-Type" content="text/html; charset=UTF-8" />
  <title>Flappy Bird</title>
  <script type="text/javascript" src="lib/createjs-2013.12.12.min.js"></script>
  <link rel="stylesheet" type="text/css" href="css/style.css" />
</head>
Now if you reload the page, you will see that it's applying the style defined in the stylesheet.
The next step you should take is defining the game area, this is going to be a div with an html canvas inside of it, so go to index.html file, and add the following text inside the body tag, right after the title.
<div id="content">
  <canvas id="gameCanvas" width="320" height="288"></canvas>
</div>
As you can see, for the canvas you only have to define the size, in this case 320x288 pixels. Then you must also append the following rules for this element to the stylesheet.
#content {
  user-select : none;
  background-color : #000000;
  width : 320px;
  height : 288px;
  margin : 50px auto;
}
For setting the size, background color, position and user-select that avoids weird behaviours when the user tries to select text over it.
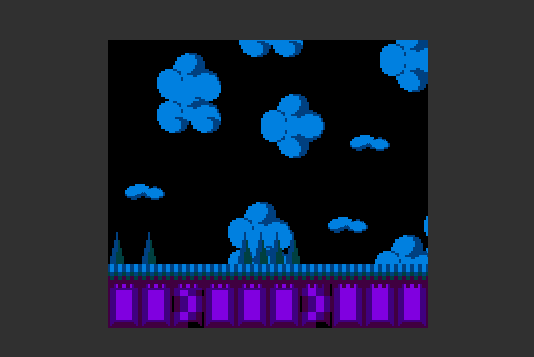
Reload the page and you will see the black rectangle below the title, where the game will take place
Init
The first thing we want to appear on the screen is the scenery, at this point we need to start creating the graphics for the game.
For this example I decided to make a tribute from one of my favourite games of all time, Sonic 2 for the Game Gear. So I will be reusing its graphics for my own version of Flappy Bird.
For getting all the graphics I recomend http://www.spriters-resource.com, there you can find ripped spritesheets of a huge number of old videogames, and I took from there the ones I will be using for the background.
Combining and editing them using GIMP I have created two images for different levels of depth of the background.


Now save those images in the img folder of the project.
Then, in index.html you have to create an initial function. This function will by defined inside of the head tag and in the body tag. It will run as soon as you load the page.
<script>
  function init() {
    canvas = document.getElementById("gameCanvas");
    scene = new createjs.Stage(canvas);

    messageField = new createjs.Text("Loading", "bold 24px Helvetica", "#FFFFFF");
    messageField.maxWidth = 1000;
    messageField.textAlign = "center";
    messageField.x = canvas.width / 2;
    messageField.y = canvas.height / 2;
    scene.addChild(messageField);
    scene.update();
</script>
</head>
<body onload="init();">
This initial function just selects the canvas by its id, initalizes create.js in it and then sets a Loading text centered in it. Note addChild to add the object to the scene, and update to draw.
By appending more content to this init function, you will be able to really load things while the Loading message is on the screen.
var manifest = [
  { id : 'floor', src : 'img/background1.png' },
  { id : 'clouds', src : 'img/background2.png' }
];

preload = new createjs.LoadQueue();
preload.addEventListener('complete', doneLoading);
preload.addEventListener('progress', updateLoading);
preload.loadManifest(manifest);
The manifest contains a couple of values, the id which is a tag that you will use in the future and src which is the path of the resource that will be loaded, in this case the two background images.
Then create an object LoadQueue, bind two events to it, and tell that LoadQueue to load the manifest previously defined.
That's enough for the init function, now the game execution flow will continue after the content is loaded.
Showing some images
There are two functions called in the Event Listeners for the LoadQueue but they are not defined, so the next step is to define them below the init function.
The first one will be UpdateLoading, that is really simple:
function updateLoading() {
  messageField.text = 'Loading ' + (preload.progress * 100 | 0) + '%'
  scene.update();
}
It just gets the loading progress, append it to the Loading message and redraws the screen.
The other function is doneLoading, it is be very simple too:
function doneLoading(event) {
  clearInterval(loadingInterval);
  messageField.text = 'Click to start';
  watchRestart();
}
It clears the interval because the load has already finished, shows a message asking for the user to click and calls a function that will just wait for the user to do it.
function watchRestart() {
  canvas.onclick = handleClick;
  stage.addChild(messageField);
  stage.update();
}
That function creates a binding to onclick, defined like this.
function handleClick() {
  stage.removeChild(messageField);
  restart();
}
Just removes the message and calls to another function called restart, and there's where the fun begins.
function restart() {
  scene.removeAllChildren();
  floorImage = preload.getResult('floor');
  floor = new createjs.Bitmap(floorImage);
  floor.x = 0;
  floor.y = 192;
  cloudsImage = preload.getResult('clouds');
  clouds = new createjs.Bitmap(cloudsImage);
  clouds.x = 0;
  clouds.y = 0;
  scene.addChild(clouds, floor);
}
This function cleans the stage by removing all the children in it, then it asks for the image using the id you previously defined, uses it for creating a Bitmap and then define its position.
Finally it adds both Bitmaps to the scene.
Note that the Y coordinate is measured from the top, so in order to move the floor down (96px of height) its y coordinate needs to be set as 288-96 = 192.
Now at the time of refreshing the browser the content will load, then it will ask for the user to click and once you click it will display the scene.
Updating the scene
The scene looks good but it's static at the moment, you need to create a loop and modify some properties each time the scene updates inside the loop. The loop function that comes with createjs is called tick and you must add it as an event listener at the end of the restart function like this.
if (!createjs.Ticker.hasEventListener("tick")) {
  createjs.Ticker.addEventListener("tick", tick);
}
This way, it will execute the tick function constantly in a loop. You can check this by creating the tick function and updating the bitmaps coordinates inside of it.
function tick(event) {
  clouds.x = clouds.x-1;
  floor.x = floor.x-2;
  stage.update(event);
}
Reload the browser and you will see how the scenery is moving, and the difference of values between the clouds and floor layers are creating the sensation of depth, very cool.
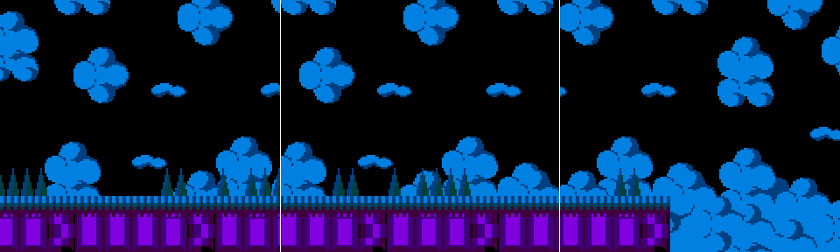
However, as seen in the image avobe there is one problem, the scenery is not infinite and as the camera moves to the left, the scenery will eventually end. To solve this and create and endless scenery use this aproach.
First, duplicate both layers inside of the reset function and position them to the right like this.
floor2 = new createjs.Bitmap(floorImage);
floor2.x = 674;
floor2.y = 192;
clouds2 = new createjs.Bitmap(cloudsImage);
clouds2.x = 640;
clouds2.y = 0;
stage.addChild(clouds, clouds2, floor, floor2);
Dont forget to move them aswell in the tick function.
clouds.x = clouds.x - 1;
floor.x = floor.x - 2;
clouds2.x = clouds2.x - 1;
floor2.x = floor2.x - 2;
stage.update(event);
674 and 640 are the width of my floor and cloud images respectively, so they will be positioned right after, now the scenery will have double length but it still ends.
The trick to create a neverending scenery it's to teleport each of this pieces as soon as they leave the screen from the left side to the right side of the viewing area like this.
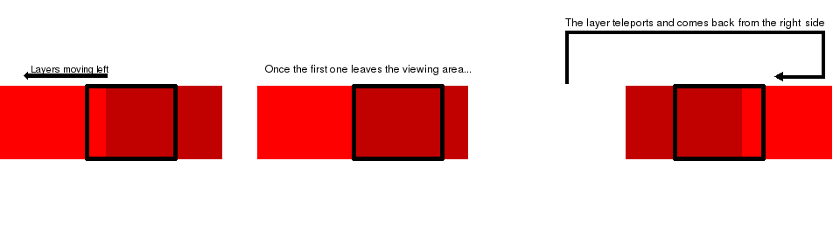
You teleport the layer just by changing its coordinate to the one you want, the implementation for this goes in the tick function.
if (floor.x == -674) {
  floor.x = 674;
}
if (floor2.x == -674) {
  floor2.x = 674;
}
if (clouds.x == -640) {
  clouds.x = 640;
}
if (clouds2.x == -640) {
  clouds2.x = 640;
}
Those conditionals check if the layers are too far away to the left and teleport them to the right side every time the screen updates.
You can reload the browser and wait all your life to the level to end, it won't happen.
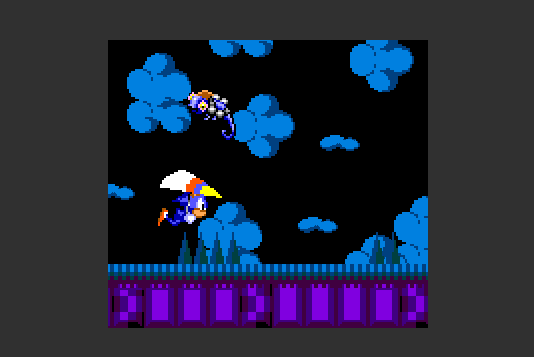
Adding a character
At this point you may start feeling you need a hero to start playing with. For creating it you will need its spritesheet. I will be using this one containg sonic flying in this hangh glider from Sonic 2.

The three first frames represent Sonic going up, then three next going straight, and the three last going down.
Put the image in the img directory as usual, and load it adding it to the manifest in the init function.
var manifest = [
  {id : 'floor', src : 'img/background1.png'},
  {id : 'clouds', src : 'img/background2.png'},
  {id : 'sonic', src : 'img/sonic.png'}
];
Now for adding it to the scene as a spritesheet it's going to be a bit different. In the restart function add this block.
sonicImage = preload.getResult('sonic');
var dataSonic = new createjs.SpriteSheet({
  'images': [sonicImage],
  'frames': {
    'regX' : 0,
    'height' : 64,
    'count' : 9,
    'regY' : 0,
    'width' : 64
  }, 'animations': {
    'up': [0, 2, 'up'],
    'straight': [3, 5, 'straight'],
    'down': [6, 8, 'down']
  }
});
sonic = new createjs.Sprite(dataSonic, 'straight');
sonic.framerate = 5;
sonic.x = 50;
sonic.y = 50;

stage.addChild(clouds, clouds2, floor, floor2, sonic);
This can look scary, but don't panic, I will explain it line by line. First it gets the image from the loader just like before.
Then it defines that structure called dataSonic, this structure is needed by createJS to define an animated sprite, the first field is images and contains just the spritesheet image gotten above. Next it goes the frames field, reX and regY are for setting where in the image the spritesheet starts, as the spritesheet covers the whole image just set them to 0.
Width and height are for setting the size of a single frame, set both to 64 because is the size of Sonic in the example spritesheet.
Then count specifies the number of frames in the spritesheet, 9 in this case.
The next section contains an array of animations, it defines 3 called straight, up and down. Each of those animation contains an starting frame index, ending frame index and an identifier for jumping once the animation has finished.
For example, the first one says:
Animation called up (for sonic going up), starts in 0 and ends in 2 (0-1-2), after the animation finishes go to up again. This way the animation will run (0-1-2-0-1-2-0-1-2...).
Finally after the dataSonic declaration, it creates the animated sprite object with it's data and the initial animation (straight for this example), and then sets the position and the framerate for the animation before adding it to the scene as a Child.
Now a browser refresh will make an animated flying Sonic appear on the screen. Woah! This starts looking promising.
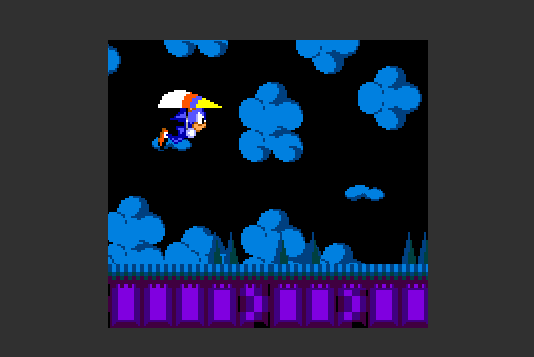
Sonic stays floating in the screen and never goes up or down, also if you have notice, when you click on the screen the level resets. That's because the event listener defined after the load has never been cleared or overwritten. Hands on!
The behaviour of Sonic will be like this, every time the screen updates in the tick function he will go down a little bit.
sonic.y = sonic.y + 10;
Now, in the restart function define an event for your click on the screen called doJump.
canvas.onclick = doJump;
This functions sets the jump value.
jump = 20;
And this value will counter the natural going down Sonic behaviour.
sonic.y = sonic.y + 10;
sonic.y = sonic.y - jump;
if (jump > 0) {
  jump = jump / 2;
}
If it's more than 0 it will divide, if not Sonic would go up forever at the first click.
Now you can play in your browser and see how the games mechanics feel like the original Flappy Bird game, nice.
Also, depending on the direction Sonic is going you also have to change the animation played.
sonic.y = sonic.y + 10;
sonic.y = sonic.y - jump;
if (jump > 0) {
  jump = jump - 2;
}
if (jump > 0) {
  jump = jump - 2;
  if (jump > 10) {
    if (sonic.currentAnimation != 'up') {
      sonic.gotoAndPlay('up');
    }
  } else {
    if (sonic.currentAnimation != 'straight') {
      sonic.gotoAndPlay('straight');
    }
  }
} else if (sonic.currentAnimation != 'down') {
  sonic.gotoAndPlay("down");
}
This piece of code is using the jump value to calculate if Sonic is going up, straight or down for setting the animation.
Adding enemies
The process for creating the enemy spritesheet is going to be really similar to the one for Sonic. I will be using this image.

Then load it using the manifest.
var manifest = [
  {id:'floor', src:'img/background1.png'},
  {id:'clouds', src:'img/background2.png'},
  {id:'sonic', src:'img/sonic.png'},
  {id:'enemy', src:'img/enemy.png'}
];
And define its animation will only have one animation.
enemyImage = preload.getResult('enemy');
var dataEnemy= new createjs.SpriteSheet({
  'images': [enemyImage],
  'frames': {
    'regX': 0,
    'height': 52,
    'count': 2,
    'regY': 0,
    'width': 48
  }, 'animations': {'stay': [0, 1, 'stay']}
});
enemy = new createjs.Sprite(dataEnemy, 'stay');
enemy.framerate = 5;
enemy.x = 150;
enemy.y = 50;
At this point the enemy will appear animated on the screen.
In the original Flappy Bird, you have to avoid pipes with holes between them, in this game I will create colums of enemies with holes between them for flying into.
Instead of a single enemy, you may modify the creation of enemies using an array.
enemies = [];
for (var i = 0; i < numEnemies; i++) {
  enemies[i] = new createjs.Sprite(dataEnemy, 'stay');
  enemies[i].framerate = Math.floor((Math.random() * 8) + 1);
  enemies[i].x = 150;
  enemies[i].y = (50 * i) - 8;
}
Note that the frameret is set using Math.random so the enemies will open their mouth at a random rate, they don't look too uniform that way. Also, using the index for the loop they are positioned as a column.
Add them to the scene using a loop too.
stage.addChild(clouds,clouds2,floor,floor2,sonic);
  for (var i = 0; i < numEnemies; i++){
    stage.addChild(enemies[i]);
  }
Refresh the browser and there you go, the evil enemy column is right in front of Sonic.
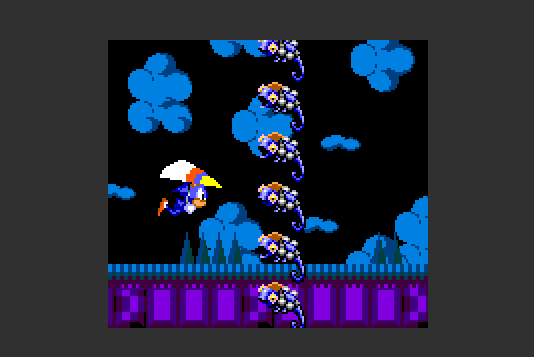
If you modify the enemy column creation code like this.
var hole = Math.floor(Math.random() * numEnemies);
for (var i = 0; i<numEnemies; i++) {
  enemies[i] = new createjs.Sprite(dataEnemy, 'stay');
  enemies[i].framerate = Math.floor((Math.random() * 8));
  enemies[i].x = 350;
  enemies[i].y = (50 * i)-8;
  if (i > hole) {
    enemies[i].y = enemies[i].y + 100;
  }
}
When the enemy colum is created, there will be a random gap of two enemies, enough for the player to pass through.
Then by updating the enemy column in the tick function you can make it move.
for (var i = 0; i < numEnemies; i++){
  if (enemies[i] != null){
    enemies[i].x = enemies[i].x - 6;
  }
}
And using a similar approach to the one used for the scenery, once an enemy row leaves the screen from the left side, it will generate another random hole and will teleport to the right side creating the illusion of endless and random enemy columns.
for (var i = 0; i < numEnemies; i++) {
  if (enemies[i] != null) {
    enemies[i].x = enemies[i].x - 6;
    if (enemies[i].x < -60) {
      enemies[i].x = 350;
      enemies[i].y = (50 * i) - 8;
      if (i > hole) {
        enemies[i].y = enemies[i].y + 100;
      }
    }
 }
}
At this moment the game will be already playable with countless random columns of enemies coming from the right side.
Collisions
The game is playable, but the player can't get hit or die so the game is too easy to play. Now add collisions so the player will have to avoid the enemies. There are several ways of doing this, but I found an already coded pixel perfect collision algorithm from indiegamr. It's perfect for this kind of game.
Get it from its Github repo, and put it into your lib directory.Don't forget it to star it!
Then import the file in index.html right below the createJS link.
<script type="text/javascript" src="lib/createjs-2013.12.12.min.js"></script>
<script type="text/javascript" src="lib/Collision-Detection-for-EaselJS/src/ndgmr.Collision.js"></script>
The usage is really simple, just by adding this line at the end of the tick function.
var collision = ndgmr.checkPixelCollision(sonic, enemies[0]);
It will check the collision between sonic and the highest enemy, so it's easy to check collision between sonic and the whole column by using a loop like this.
var collision = ndgmr.checkPixelCollision(sonic, enemies[0]);
var collision = false;
var i = 0;
while (!collision && i < numEnemies){
  var collision = ndgmr.checkPixelCollision(sonic, enemies[i]);
  i++;
}
This way the collision will be checked against the whole column. Now that you can detect collisions it's time to move on and code what happends when Sonic collides with an enemy.
First I need a new frame for Sonic getting hurt and also another of Sonic dying.

I also will add some frames to the flying Sonic spritesheet, the same that I used for the hang glider going down, but without Sonic this time.

Now, then the collision is detected some changes happen.
if (collision && !isHurt){
  canvas.onclick = null;
  isHurt = true;
  die();
}
The die function creates an object that represents a dying Sonic.
function die(){
  sonicDyingImage= preload.getResult('sonicDying');
  var dataSonicDying = new createjs.SpriteSheet({
    'images': [sonicDyingImage],
    'frames': {
      'regX': 0,
      'height': 64,
      'count': 2,
      'regY': 0,
      'width': 48
    }, 'animations': {
      'dead': [0, 0, 'dead'],
      'hurt': [1, 1, 'hurt']
    }
  });
  sonicDying = new createjs.Sprite(dataSonicDying, "hurt");
  sonicDying.x = sonic.x;
  sonicDying.y = sonic.y;
  stage.addChild(sonicDying);
}
That isHurt variable will also used to stop moving back the backgroud and enemies and start moving forward the hang glider, creating the illusion that the camera stopped, but the glider goes on. Also the new dying Sonic will update its position as the glider goes away.
At this point the main game mechanics will be finished and all the main aspects of the game development have been covered. From now to the final version I uploaded there are only details and code cleaning and refactoring that I won't be detailing.
I hope you liked this article, and see you next time!
Changes for the final version
- Code refactoring.
- Transitions and game reset.
- CSS styling for the website.
- NodeJS + Socket.io backend for storing scores.
- Graphic improvements.
- Touchscreen support.
Final version sourcecode
You can find the final version sourcecode in its Github. Also you can play the game here.